
Messy Mistakes to Avoid When Dumping RV Water Tanks
4 min read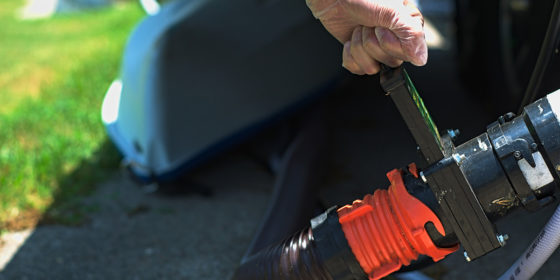
Are you an RV owner who dreads the task of dumping your black and gray tanks? If so, don’t worry: there are ways to make this process easier and less messy. While it can be a daunting prospect, with the right tips and tricks, you’ll be able to dump your Class A motorhome, travel trailer, or other RV’s tanks quickly and efficiently while keeping yourself clean in the process. In this blog post, RVT is sharing top strategies for reducing mess when dumping RV black and gray tanks. From staying organized to minimizing spills, these tactics will help ensure that each dumping experience is smooth sailing.
1. Preparing to Dump RV Black and Gray Tanks
Before you dump your RV’s black and gray tanks, it is important to ensure that you are prepared. Make sure that you have all of the necessary supplies, such as gloves, a hose, and a sewer connection. Additionally, check for any leaks in your hoses or connections before beginning. It may also be helpful to add special cleaning products designed specifically for this task. This will help reduce odors while ensuring that everything runs smoothly during the dumping process. Finally, don’t forget to set up an area with newspaper or plastic sheets so that any spills can be quickly cleaned up without making too much of a mess. With these preparations complete, you’ll be ready to successfully dump your RV’s black and gray tanks.
2. Minimizing Mess with a No-Splash Hose Attachment
One of the best ways to avoid making a mess is by using a no-splash hose attachment when dumping your RV’s black and gray tanks. These attachments fit onto the end of any standard sewer hose, creating an airtight seal that prevents splashing back when emptying out wastewater. Not only does this make it easier to stay clean during the process, but it also helps keep nearby areas free of unsightly wastewater as well.
3. Ensuring the Right Connections are in Place
When it comes to RV dumping, the most important step is making sure your black and gray tank connections are in place. This means connecting your dump hose from the RV to the sewer connection at a campground or other designated area. You should also make sure that you have enough length of hose for the job, as well as appropriate adapters if needed. It’s a good idea to check all clamps and seals on any hoses or connectors that may be used, ensuring they are properly tightened before use.
4. Tips for Staying Clean During the Process
There are several tips and tricks that you can use to stay clean and make the dumping process more efficient. Do yourself a favor and keep a box of disposable gloves handy while you’re navigating this process. After some practice, you can keep a set of washable, reusable gloves on hand.
Be sure to take your time when dumping for the first few times. Try to choose a dump station with multiple ports so there’s no one in line behind you, or go dump during a less-popular time. For instance, dump your RV tanks during the evening instead of morning when most campers are checking out. Going slow will allow you to ensure all the connections are tight and prevent any mistakes.
5. Cleaning Up Afterward for a Better Experience Next Time
Once you’ve finished dumping your tanks, it’s important to take some time to clean up after yourself. This will help ensure that the next time you need to dump your tanks, the experience is as streamlined as possible. Cleaning up includes not only wiping down any surfaces that may have been splashed in the process, but also rinsing off any hoses or attachments used for dumping. Additionally, try to find an area with good drainage so that wastewater doesn’t pool around your RV when emptying out tanks. Taking these extra steps will go a long way in making sure future trips are more enjoyable!
6. Maintaining Your RV’s Sewer System Regularly
Maintaining an RV’s sewer system is vital for keeping the vehicle running smoothly and avoiding any inconvenient disasters. Be sure to properly rinse out your sewer hose before storing, and give that baby a deep clean after every trip. A great method for deep cleaning your hose is to fill it with a mixture of hot water and RV toilet cleaner, then allow it to sit overnight before draining out the solution. Then, make sure to rinse the hose completely with a garden hose before storing away.
Keeping your RV’s sewer system and toilet clean is essential for preventing any clogs. You should flush out the black tank regularly to keep it from filling up too quickly, using a product like RV Digest-It to help break down waste in the tank. When you are finished emptying your tanks, you can start them off fresh by adding cleaners to the tanks, which will minimize odors between dumping.
Dumping your RV black and gray tanks doesn’t have to be a chaotic task. With the tips outlined in this blog post, you can stay organized, minimize spills, make sure all connections are secure, clean up afterward for an even better experience next time around, and maintain regular maintenance on your RV’s sewer system. So don’t let dumping become a dreaded chore – with these strategies, you will be able to dump efficiently and keep everything neat and tidy! Now that you know how to do it right – happy camping!
Looking to buy a new or used RV? Check out the latest listings at RVT.com.
By Sam Moon


